BASIC SPRAY TUTORIAL
The
way colour sprays are used is totaly different, then using the ordinary logo's
in half-life. Normally you would place a bmp file into your logo folder and
choose from it by going into your customize menu in the game.
Colour logo's don't work like that. First of all the file is not a bmp image but
it's called a pldecal.wad.
A pldecal.wad is a compressed .bmp image and converting a .bmp
image into a pldecal.wad, can be done with a programm called wally. But i
will come to this subject later on in this tutorial.
Second, the image is not placed into your logo folder, but into the game folder
of the game you wanna play. Let me show you what i mean :
*
Internet version
If you play Counterstrike, the folder to place the pldecal.wad into is : halflife\cstrike
If you play TFC then the folder to place the pldecal.wad into is : halflife\TFC
If you play FLF then the folder to place the pldecal.wad into is : halflife\frontline
If you play HL then the folder to place the pldecal.wad into is : halflife\valve
* Retail version
For CS retail, the folder to place the pldecal.wad into is : sierra\counter-strike\cstrike
If it aks you to overwrite the pldecal.wad in your game dir...press yes
Third,
a colour logo can't be choosen from the custimize logo menu, but it's
automatically placed within your game. If you do go into customize, you will
messup the colour logo and HL will replace the colour logo by the basic pldecal.
So if this happens, just place the pldecal.wad back again in your
game folder and go play.
Basicaly, the only thing you have to do is:
. place your spray into your game folder
. Go play
SPRAY
SIZES
Spray images are uploaded from your computer to the server where you play
on and the server will send it to all the players on that server, so that they
see it also in the game.
But a spray has his limit on how big the size can be. The pldecal.wad
can be only 15 kb max in size. If you make it bigger,, the server
won't upload it becoz it's 2 big.
So make sure you don't cross that 15 kb file size. You can use all
kinds of sizes when creating images in your paint prg, but the largest size you
can use is 144*80 - 80*144 and the size has to be dividable by 16
The sizes we recommend to you are : 128*64 - 64*128
" Now why use only those settings and not the biggest one or smaller
ones ", you might ask your self. We'll let met explain this item a bit
more..
A - It has all to do with the quality and size limit of the image in the
game
The size of the textures in the game are most of the time been made out of sizes
in which computer count. Computers count like this :
0 1 2 4 8 16 32 64 128 256 512 1024 and so on
If
you spray an image on the wall for example, your spray will count the size of
the texture and see if it fits into one of these sizes. Becoz our spray size is
listed in the size count ( 0 1 2 4 8 16 32 64 128 256 512 1024 ) it will
stay in the right shape
and the spray will not resize itself into the correct size..
If you take for example the 144*80 - 80*144 spray and spray in on
a wall, you will see it will become blurry and resized. This is because the
values of this spray sizes are not listed in the ( 0 1 2 4 8 16 32 64 128 256
512 1024 )
You can simply test it by placing the exact image from the 128*64 size into your
144*80 size and you will see that the same image will look more blurry then the
image in the 128*64 size.
Sometimes it may happen that you still have a stretched spray, even when you
keep the size to 128*64 - 64*128. This is simply explained becoz
map makers sumtimes stretch textures in the game and when you spray on them ,
the sprays will
also automatically stretch.
Also when considering that 128*64 - 64*128 are the biggest files
you can get while obtaining the quality in images, you don't have to make
smaller sizes to make smaller logo's. Just draw the images smaller in the 128*64
- 64*128. That's
better and you can add stuff to it to make it better. So that's why we only use 128*64
- 64*128.
Quality sprays can only be done like this......
CONVERTING IMAGES INTO BMP FILES
Oke
now we have reached the point that we're actually gonna create an image.
I use for this example Photoshop, because only work with Photoshop.There are 2
ways of creating spray pictures.
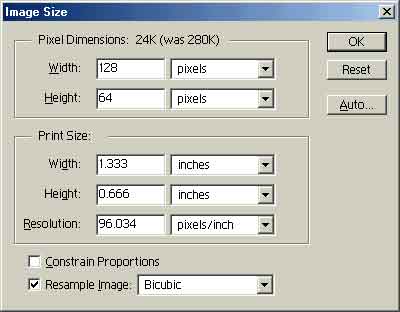
create one by simply resizing an image to 128*64 - 64*128
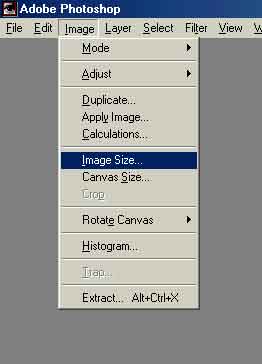
FIRST LOAD THE IMAGE AND THEN GO TO : IMAGE-IMAGE SIZE
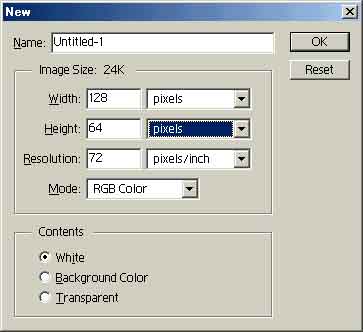
Or open an empty file to 128*64
- 64*128 and create one your self by
pressing the file menu in the left screen and press NEW
Now
you can make your own image.
There
is one really important thing you should know and that's when converting the bmp
image into a wad file, the converted image will look more brighten and
the contrast will be also set to high. the image as lost a lot of colour depth
This is not doing anything good to the image, so we have to fake wally a bit.
We have to tweak the brightness and the contrast a bit,
before saving it away as a bmp file.
But be sure that if you made your own logo and used layers in your image
that you first must flatten the image b4 doing the tweak on the
brightness and contrast.
Becoz if you don't do that , the adjustment of the brightness and constrast will
only occur on that selected layer.....
oke let's continue the tweak !!!
- TWEAK BRIGHTNESS AND CONTRAST : IMAGE-ADJUST-BRIGHTNESS/CONTRAST
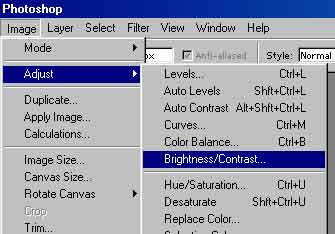
Then place the brightness to max - 26 and the contrast to max +28. This is
really depending on how many colours are used in the image. Try to experiment
with it. It has to look more darken then the original one.

after this, the image is almost ready for use. But we have to save it away as a bmp file first. Choose in the left corner for File again and then for save a copy.
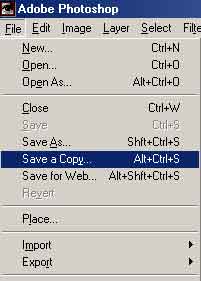
Choose then for save as a bmp
Now
the file select will come and ask you to save in 24 bit image this is
very important coz the 24 bit image quality makes the logo also looking
very good. Saving a bmp file on 8 bit will destroy the quality of the logo
Oke we're almost done now. We only have to convert the bmp file into a pldecal.wad.
This can be done with the programm called ' WALLY '
You can download it here below, just press one of the links
Oke
now the makers of wally made it really simple to convert an .bmp image into a
pldecal file. Run the wally programm and go directly to the wizard modus.
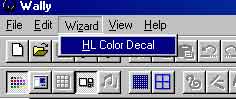
After that this screen will appear :
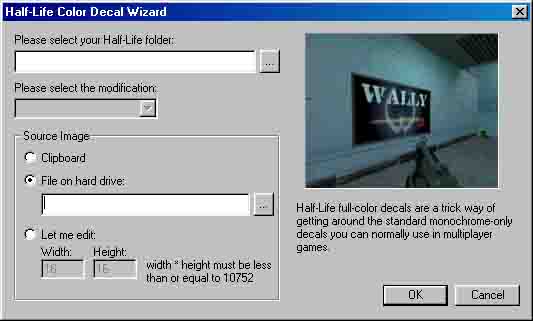
Now
press on the file on hard drive and select the folder or place on your computer
where you have saved your .bmp file.
Then press oke and wally will automatically convert it into a pldecal.wad. Also
the last colour in that picture will be automatically be set on 0.0.255
Now go to : file - save as and there you should choose a directory to
save your pldecal.
Make sure your saved file is called pldecal.
Now go to your games folder of halflife and select the folder of the game you
play.
* Internet version
If you play Counterstrike, the folder to place the pldecal.wad into is : halflife\cstrike
If you play TFC then the folder to place the pldecal.wad into is : halflife\TFC
If you play FLF then the folder to place the pldecal.wad into is : halflife\frontline
If you play HL then the folder to place the pldecal.wad into is : halflife\valve
* Retail version
For CS retail, the folder to place the pldecal.wad into is : sierra\counter-strike\cstrike
If it aks you to overwrite the pldecal.wad in your game dir...press yes
Now your ready to spray your colour logo in the game. The only difference
between the old way of using logo's and this way, is that you can't select
logo's and switch between them in Halflife.
So don't go into your customize menu
otherwise you will destroy the colour logo and you have to start all over again
by copying the pldecal.wad into your game dir.
Just start that damn :) game and go play. it's automatically configured for you
to use it in the game. If you don't see it the first time, just spray it the 2nd
time after 1 minute and then you should see it. This is because the server has
to upload it
you know....